Inspiration
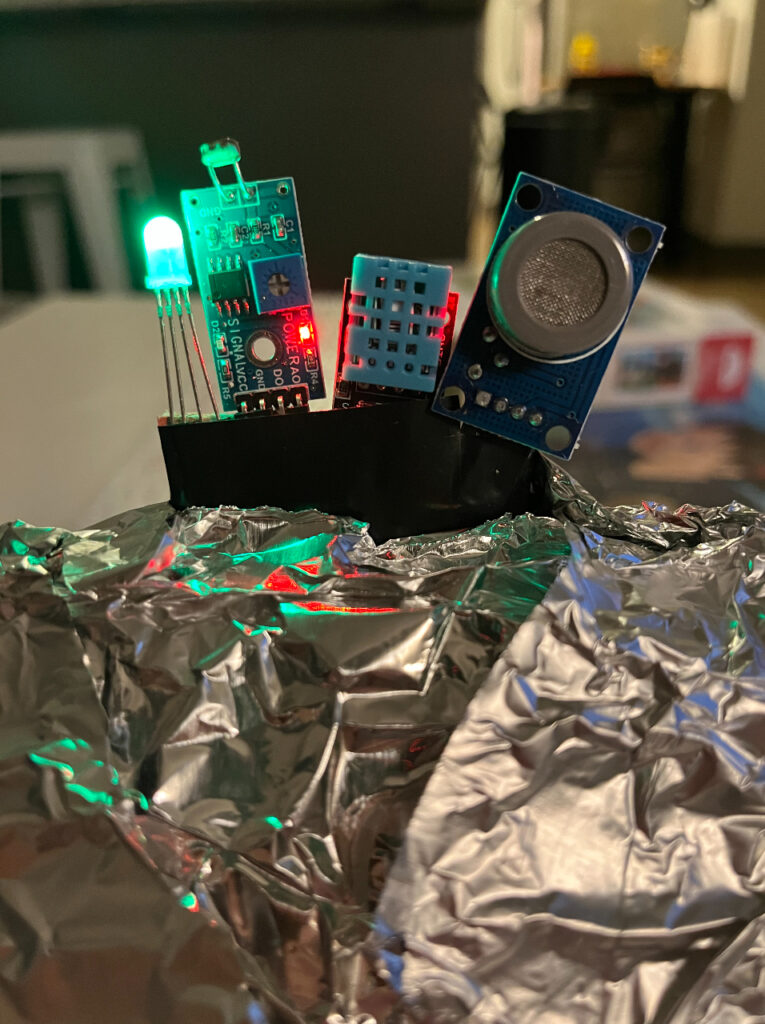
For my Film Prop, I built an environment sensing station that detects light, carbon monoxide levels, temperature, humidity, and outputs the data to a live realtime web based interface. The high level concept is the “Hab” that the astronauts live in suffered extreme damage during a Martian sandstorm, and the environment sensing and calibration system has been rendered un-useable. In order for the astronauts to be able to make repairs, they must first be able to get accurate data on the environment to ensure that it is human friendly. Thankfully, they were able to repurpose sensors on their spacesuit into this semi-mobile environmental sensing module and station.
Hardware
Sensors and Modules
- Arduino Uno Rev3
- ESP 8266-01 WiFi Module
- DHT11 Temperature and Humidity Sensor
- MQ7 Carbon Monoxide Sensor
- LDR Sensor Module
- RGB LED
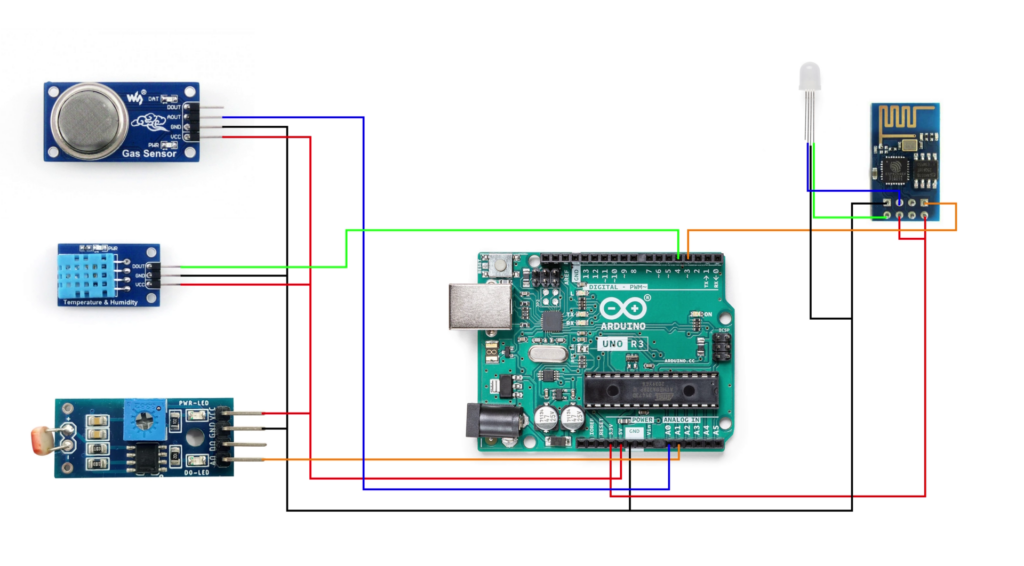
Schematic and Wiring

MQ7 Carbon Monoxide Sensor
- VCC -> Arudino 5V
- Analog Out -> Arduino A0
- GND -> Arduino GND
DHT11 Temperature and Humidity Sensor
- VCC -> Arduino 5V
- Data out -> Arduino D4
- GND -> Arduino GND
LDR Sensor module
- VCC -> Arduino 5V
- Analog Out -> Arduino A1
- GND -> Arduino GND
ESP8266
- 3.3V -> Arduino 3.3V
- CH_PD -> Arduino 3.3V
- GND -> Arduino GND
- RX -> Arduino D3
RGB LED
- R -> ESP8266 TX
- GND -> Arduino GND
- G -> ESP8266 GPIO2
How to upload software to ESP8266
There are many libraries to interface with the ESP8266 using Arduino IDE. This project uses the library based on this tutorial. From what I can tell, this library is now deprecated and should not be used in production. The board and library versions depend on this deprecated library, and updating to a maintained ESP8266 Firebase library will require modifications to the provided code.
A few libraries I recommend using instead:
1. Install ESP866 board Manager
You need to first add a board manager for the ESP8266. This adds the necessary firmware to your Arduino IDE in order to compile and upload code to the ESP8266. Here are the steps to do that here. You should use the link below.
http://arduino.esp8266.com/stable/package_esp8266com_index.json
and the board selected should be:
Generic ESP8266 Module
2. BOOT esp8266 in Flash mode
In order to actually upload code to the ESP8266, you need to boot the module in flash mode. You can read more about it here.
- GPIO0 must be pulled down to LOW (connect to Arduino GND)
- CH_PD must be pulled up to HIGH (connect to Arduino 3.3V)
After this step, you should be able to now upload code to the ESP8266 through the Arduino IDE.
3. Code upload
Additionally, you need to pass the upload information to the ESP8266 through the Arduino, you can do this through RX/TX pins.
- ESP8266 TX -> Arduino TX
- ESP8266 RX -> Arduino RX
If you run into any errors:
- Make sure that there is no serial monitor open when uploading code. If you are using the Arduino RX/TX to upload code to the ESP8266, then having a serial monitor open will interfere with the upload.
- Make sure you have the correct esp8266 board version installed. For this project, it is 2.5.0
Database setup and webapp
1. Install ESP8266 and Firebase Libraries
Download and install the ESP8266 Firebase library here. Follow this tutorial to learn how to get the basic ESP8266 Firebase library working.
- If you have trouble connecting to Firebase, verify that your hostname and authentication key are correct.
- You may also need to update your fingerprint. Steps on how to do that are linked here.
2. WEbapp
Source code for the webapp is linked here. It is a React app built with Nextjs and Typescript. You can fork the repo.
Code Overview
WiFi setup code. Upload to ESP8266
#include <ESP8266WiFi.h>
#include <FirebaseArduino.h>
#include <SoftwareSerial.h>

// Secrets
#define FIREBASE_HOST "YOUR_HOST"
#define FIREBASE_AUTH "YOUR_TOKEN"
#define WIFI_SSID "WIFI_SSID"
#define WIFI_PASSWORD "WIFI_PASSWORD"

// Digital Pins
#define RX_PIN 3
#define TX_OR_RED_PIN 1
SoftwareSerial ArduinoSerial (RX_PIN, TX_OR_RED_PIN);

#define GREEN_PIN 2

const bool DEBUG = false;

void setup()
{
  // Init LED
  pinMode(GREEN_PIN, OUTPUT);
  if (!DEBUG)
  {
    pinMode(TX_OR_RED_PIN, OUTPUT);
  }

  // Begin communication with arduino
  ArduinoSerial.begin(9600);

  // Init wifi
  initWifi();

  // Init firebase
  Firebase.begin(FIREBASE_HOST, FIREBASE_AUTH);
}


void loop()
{
  if (WiFi.status() == WL_CONNECTED)
  { //Check WiFi connection status
    sendWifiSuccess();
    readAndSendData();
  }
  else
  {
    sendWifiError();
  }

  delay(1000);  //Send a request every 1 second
}

void initWifi() {
  // connect to wifi.
  WiFi.begin(WIFI_SSID, WIFI_PASSWORD);
  if (DEBUG)
  {
    ArduinoSerial.print("connecting");
  }
  while (WiFi.status() != WL_CONNECTED) {
    if (DEBUG)
    {
      ArduinoSerial.print(".");
    }
    delay(500);
  }
  if (DEBUG)
  {
    ArduinoSerial.println();
    ArduinoSerial.print("connected: ");
    ArduinoSerial.println(WiFi.localIP());
  }
}

void readAndSendData()
{
  while (ArduinoSerial.available() > 0)
  {
    //Create a place to hold the incoming message
    static char message[300];
    static unsigned int message_pos = 0;

    //Read the next available byte in the serial receive buffer
    char inByte = ArduinoSerial.read();

    //Message coming in (check not terminating character) and guard for over message size
    if ( inByte != '\n' && (message_pos < 300 - 1) )
    {
      //Add the incoming byte to our message
      message[message_pos] = inByte;
      message_pos++;
    }
    //Full message received...
    else
    {
      //Add null character to string
      message[message_pos] = '\0';

      // Attmpet construct JSON
      DynamicJsonBuffer jsonBuffer(300);
      static unsigned int jsonPos = 0;
      JsonObject& root = jsonBuffer.parseObject(message);

      // If successfully parsed message into json object
      if (root.success())
      {
        // send to firebase
        Firebase.set("data", root);

        // handle error
        if (Firebase.failed())
        {
          analogWrite(GREEN_PIN, 0);
          analogWrite(TX_OR_RED_PIN, 255);
          if (DEBUG)
          {
            ArduinoSerial.println("Failed to set data.");
          }
        }
        else
        {
          analogWrite(GREEN_PIN,  255);
          if (DEBUG)
          {
            ArduinoSerial.println("Set data successfully.");
          }
        }
      }
      // ... it's probably a string
      else
      {
        if (DEBUG)
        {
          // send back to arduino
          ArduinoSerial.println(message);
        }
      }
      // reset message position
      message_pos = 0;
    }
  }
}

void sendWifiSuccess() {
  if (DEBUG)
  {
    ArduinoSerial.println("Success: connected to wifi");
  }
  analogWrite(GREEN_PIN, 125);
  analogWrite(TX_OR_RED_PIN, 0);
}

void sendWifiError() {
  if (DEBUG)
  {
    ArduinoSerial.println("Error: could not connect to wifi");
  }
  analogWrite(GREEN_PIN, 0);
  analogWrite(TX_OR_RED_PIN, 125);
}
Sensor setup code. Upload to arduino.
#include <ArduinoJson.h>
#include <SoftwareSerial.h>
#include <DHT.h>

// Digital Pints
#define RX_PIN 2
#define TX_PIN 3
SoftwareSerial ESPSerial(RX_PIN, TX_PIN);

#define DHT_PIN 4
#define DHT_TYPE DHT11
DHT dht(DHT_PIN, DHT_TYPE);

// Analog Pins
#define MQ_PIN 0
#define LDR_PIN 1

const bool DEBUG = true;
const bool ESP_DEBUG = false;

int temperature;
int humidity;
int gas;
int light;

void setup() {
  // Init temperature sensor
  dht.begin();

  // Init serial monitor
  Serial.begin(9600);

  // Init communication with ESP8266
  ESPSerial.begin(9600);
}

void loop() {
  if (ESP_DEBUG)
  {
    readSerial();
  }
  getSensorData();
  sendData();
  delay(1000);
}

void sendData() {
  // construct json object
  StaticJsonBuffer<300> jsonBuffer;
  JsonObject& json = jsonBuffer.createObject();

  // add data
  json["temperature"] = temperature;
  json["humidity"] = humidity;
  json["gas"] = gas;
  json["light"] = light;

  // send to ESP8266
  json.printTo(ESPSerial);
  ESPSerial.println();

  if (DEBUG)
  {
    Serial.print("Sent to ESP: ");
    json.printTo(Serial);
    Serial.println();
  }
}

void readSerial() {
  while (ESPSerial.available() > 0)
  {
    //Create a buffer to hold the incoming message
    static char message[300];
    static unsigned int message_pos = 0;

    //Read the next available byte in the serial receive buffer
    char inByte = ESPSerial.read();

    //Message coming in (check not terminating character) and guard for over message size
    if ( inByte != '\n' && (message_pos < 300 - 1) )
    {
      //Add the incoming byte to our message
      message[message_pos] = inByte;
      message_pos++;
    }
    //Full message received...
    else
    {
      //Add null character to string
      message[message_pos] = '\0';

      //Print the message (or do other things)
      if (DEBUG)
      {
        Serial.println(message);
      }

      //Reset for the next message
      message_pos = 0;
    }
  }
}

void getSensorData() {
  temperature = dht.readTemperature();
  humidity = dht.readHumidity();
  gas = analogRead(MQ_PIN);
  light = analogRead(LDR_PIN);

  if (DEBUG)
  {
    Serial.print("Temperature: ");
    Serial.print(temperature);
    Serial.print(", Humidity: ");
    Serial.print(temperature);
    Serial.print(", Gas: ");
    Serial.print(gas);
    Serial.print(", Light: ");
    Serial.println(light);
  }
}
Leave a Reply