Angelica Jones
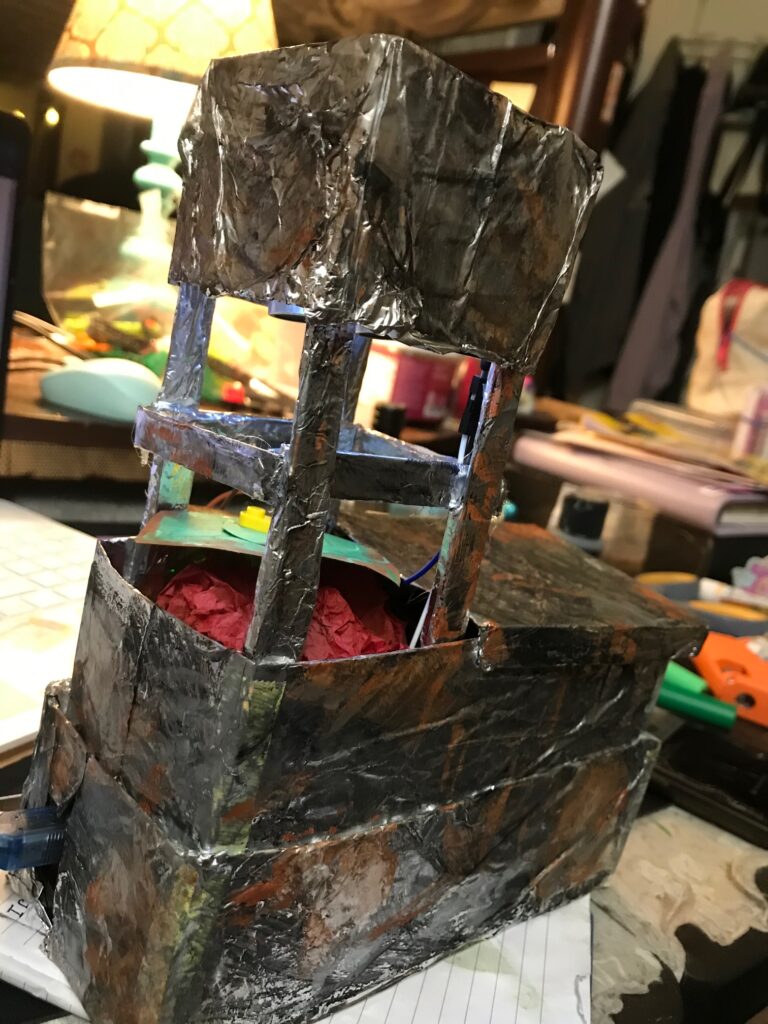
Imagine this: During The Martian 2, you have limited resources to create grow boxes to grow plants to sustain life on Mars.
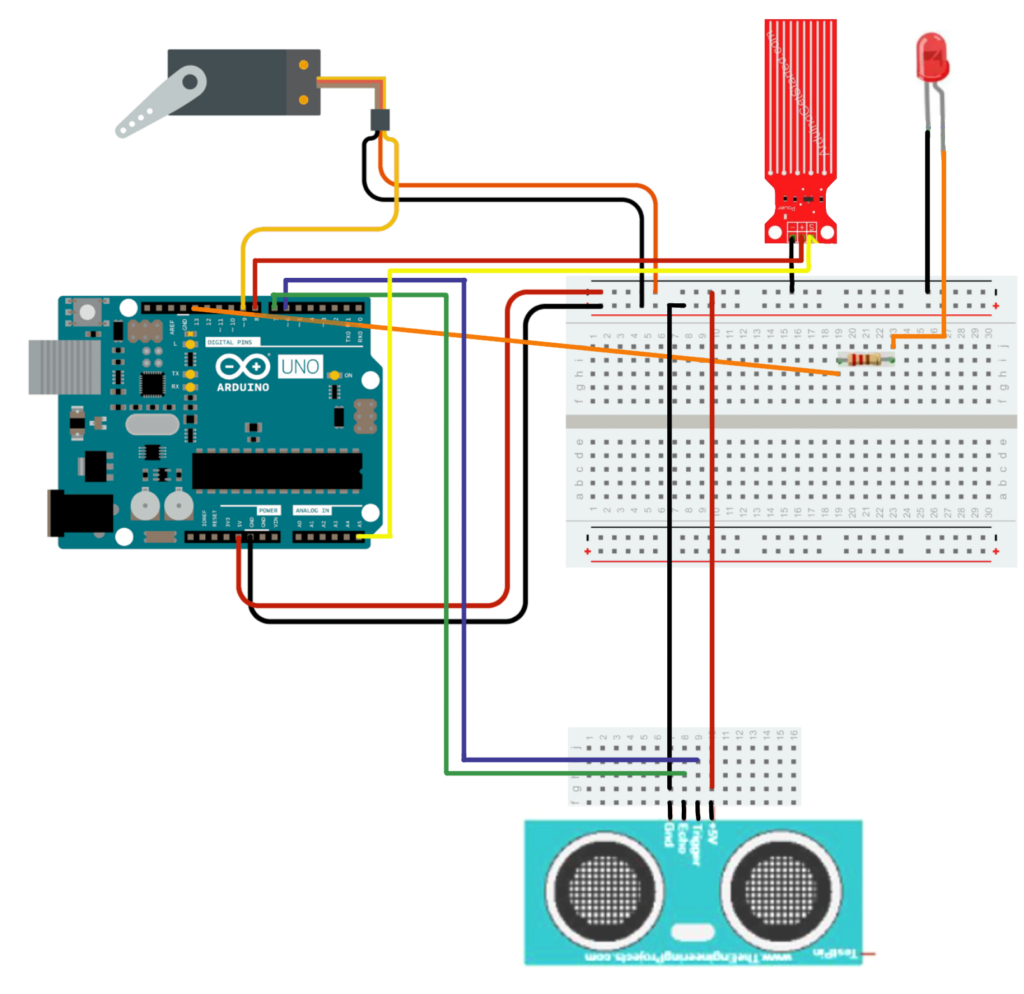
For my film prop, I combined a water sensor, an ultrasonic sensor, a servo motor, and an LED light to create this film prop. Initially, I wanted to the the FSR pressure sensor to simulate the act of watering. It didn’t work as I had wanted it to, so I had to swap it with the water sensor.
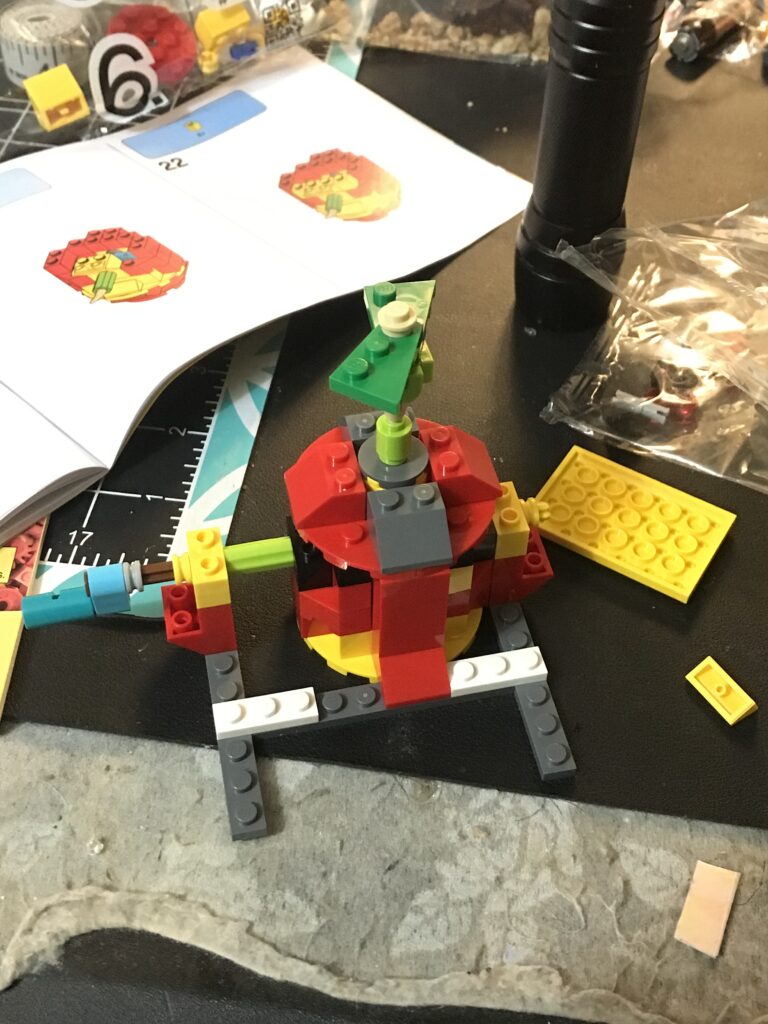
By using aluminum foil, cardstock, Legos, and other craft supplies, I was able to create the sturdy and aesthetically accurate grow box.
Planning and Implementing
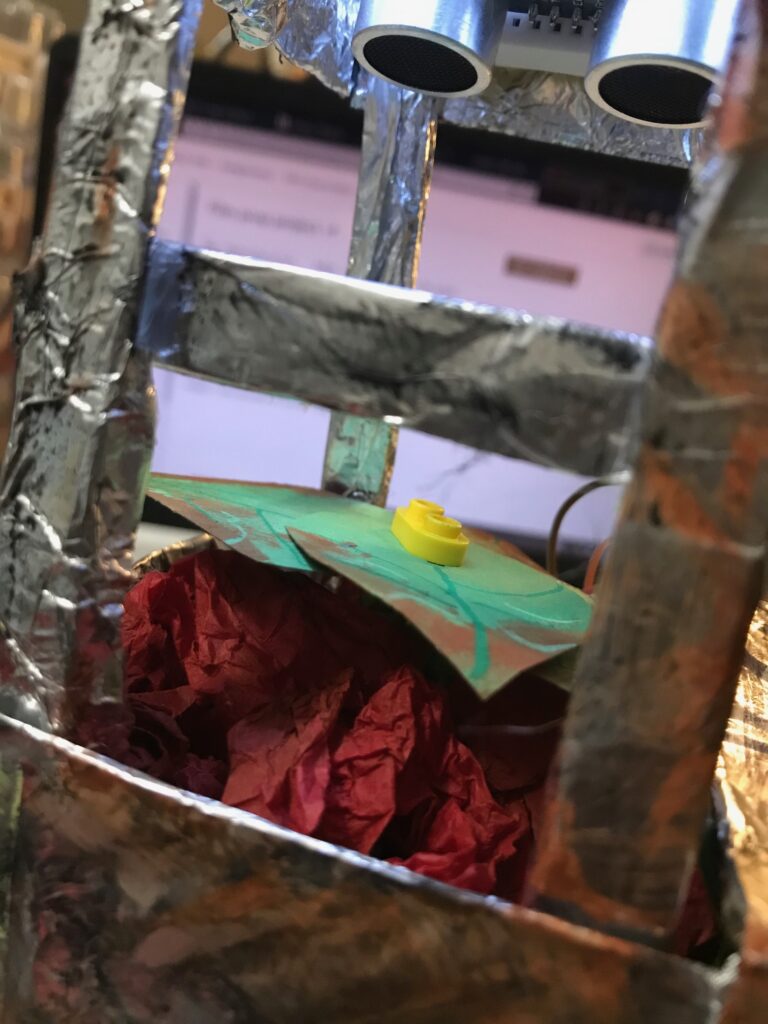
The first thing I did was draw a quick diagram to understand the placement of the breadboards, since everything must be hidden. My end result mostly follows this diagram with some small variation.
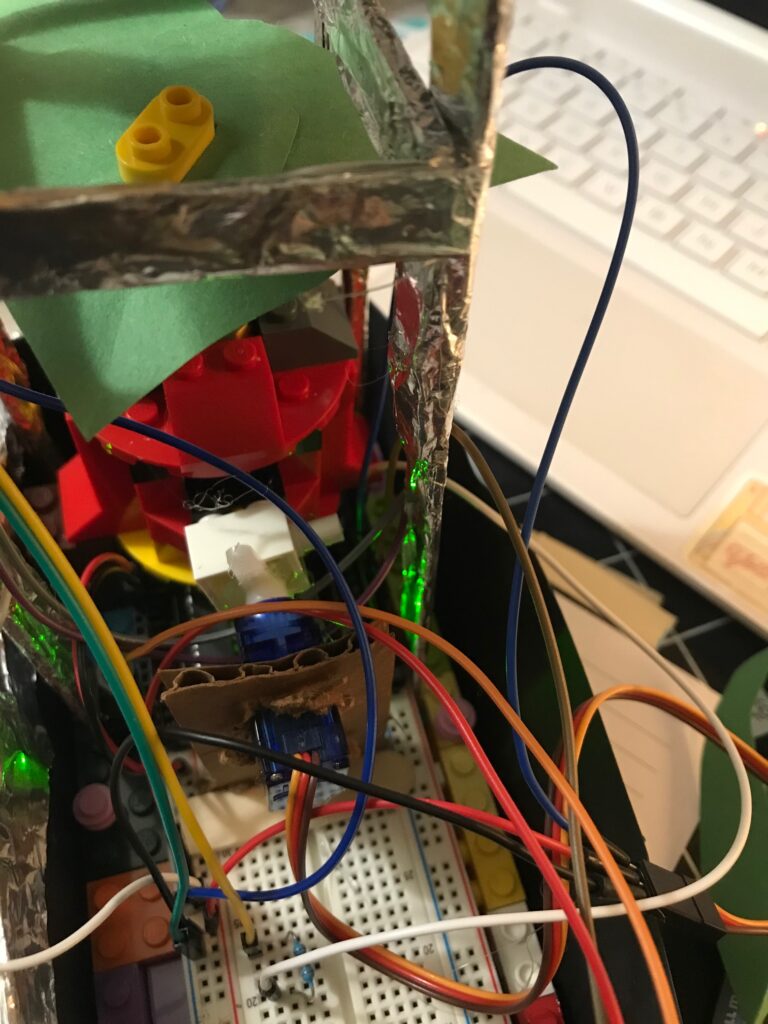
The ultrasonic sensor is attached at the top to the mini breadboard, which is then wired to the power of the bigger breadboard. The LED is wired directly to the bigger breadboard by using longer wires. The servo motor is directly attached to the Lego contraption for the plant. It is also wired to the bigger breadboard. The contraption as a Lego piece in the middle of it that will kick up the plant as the servo motor sweeps (it is the blue piece as seen in the page in the back ground). I did have to change the leaves of the plant to paper instead of the Legos, because the ultrasonic had problems properly detecting the growth with the pieces being at slightly different heights.
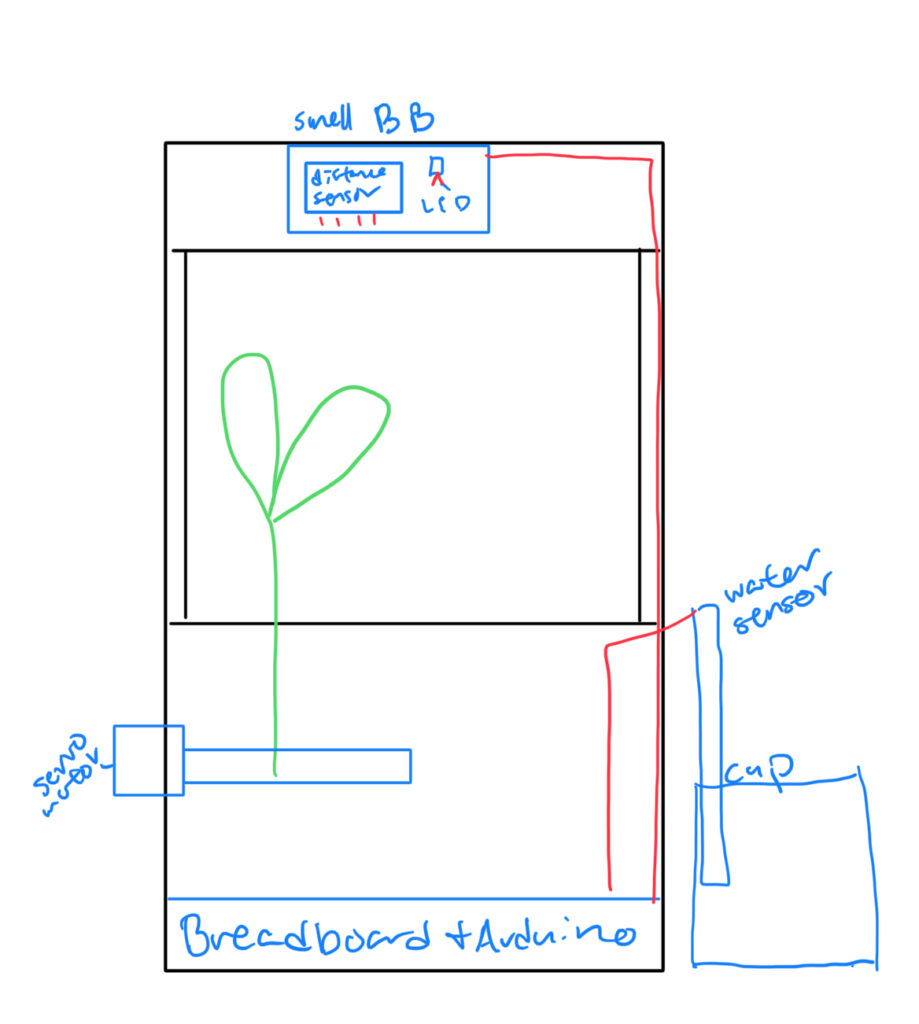
I placed my Arduino directly under the contraption to save some space. The servo motor is attached to a piece of cardboard to stabilize it to the contraption.
Below is my code. I don’t think it is the most efficient code in the world, but it gets the job done. I did have a trouble with the LED, but I was able to solve it with an if/else statement. The Links below will help explain parts of the code better than I can.
#include <Servo.h>
#define echoPin 6 // Echo Pin of Ultrasonic Sensor
#define pingPin 7 // Trigger Pin of Ultrasonic Sensor
#define POWER_PIN  8
#define SIGNAL_PIN A5
Servo myservo;
int pos = 0;
int waterVal = 0; // variable to store the water sensor value
long disVal; // variable to store the distance sensor value
long duration;

void setup() {
  // put your setup code here, to run once:
  Serial.begin(9600); // Starting Serial Terminal
  // initialize digital pin LED_BUILTIN as an output.
  pinMode(LED_BUILTIN, OUTPUT);
  pinMode(POWER_PIN, OUTPUT);   // configure D7 pin as an OUTPUT water
  digitalWrite(POWER_PIN, LOW); // turn the sensor OFF water

  myservo.attach(9);  // attaches the servo on pin 9 to the servo object
}

void loop() {
  // put your main code here, to run repeatedly:
  //digitalWrite(LED_BUILTIN, LOW);   // turn the LED off by making the voltage LOW
  digitalWrite(POWER_PIN, HIGH);  // turn the sensor ON
  delay(10);                      // wait 10 milliseconds
  waterVal = analogRead(SIGNAL_PIN); // read the analog value from sensor
  digitalWrite(POWER_PIN, LOW);
  Serial.print("Sensor value: ");
  Serial.println(waterVal);

  pinMode(pingPin, OUTPUT);
  digitalWrite(pingPin, LOW);
  delayMicroseconds(2);
  digitalWrite(pingPin, HIGH);
  delayMicroseconds(10);
  digitalWrite(pingPin, LOW);
  pinMode(echoPin, INPUT);
  duration = pulseIn(echoPin, HIGH);
  disVal = microsecondsToCentimeters(duration);
  Serial.print(disVal);
  Serial.print("cm, ");
  delay(500);
  if (waterVal >= 350)
  {
    for (pos = 0; pos <= 180; pos += 1)
    { // goes from 0 degrees to 180 degrees
      // in steps of 1 degree
      myservo.write(pos);              // tell servo to go to position in variable 'pos'
      delay(15);                       // waits 15ms for the servo to reach the position
    }
    for (pos = 180; pos >= 1800; pos -= 1)
    { // goes from 180 degrees to 0 degrees
      myservo.write(pos);              // tell servo to go to position in variable 'pos'
      delay(15);                       // waits 15ms for the servo to reach the position
    }
    digitalWrite(LED_BUILTIN, HIGH);  // turn the LED on (HIGH is the voltage level)
  }
  if (disVal <5)
  {
    myservo.write(0);
    digitalWrite(LED_BUILTIN, LOW);  // turn the LED on (HIGH is the voltage level)
  }
  else
  {
    digitalWrite(LED_BUILTIN, HIGH);  // turn the LED on (HIGH is the voltage level)
  }
}

long microsecondsToCentimeters(long microseconds)
{
   return microseconds / 29 / 2;
}
The Prop
My project works by “watering” the plant (placing the water sensor in a small cup of water), which will allow the plant to “grow” (the servo motor turns on). Once the plant reaches its max height, the LED light will turn off, indicating the end of the grow cycle.

Helpful Links:
- https://docs.arduino.cc/learn/electronics/servo-motors
- https://www.tutorialspoint.com/arduino/arduino_ultrasonic_sensor.htm
- https://arduinogetstarted.com/tutorials/arduino-water-sensor
Leave a Reply